
The Complete Guide to Brunch Boards
JUMP TO:
The Basics - Fillers - Theme Ideas - Layout - Tips & Tricks
The birds are chirping, the trees are blooming, and big patches of green grass are blessing the barren gray parks in downtown Portland. The fresh air blowing in the open windows is inspiring vernal thoughts of spring baking and slow, drizzly mornings.
With springtime having arrived full force, there are lots of warm weekends on the horizon that would be deliciously celebrated with one of my favorite things - a brunch board! If you’re not familiar with the concept, think of classic charcuterie with brunch-y substitutions. It’s great because you can go a breakfast, lunch, or snack route and they all work! They’ve been trending on Instagram, Tiktok, and Pinterest the last few years. I’d been itching to try my hand at them for some time, and I figured others might be too, but may not be sure where to start. So, let’s dive into how to create one and you’ll be ready to feast at your next celebration!

THE BASICS
Let’s start with how to create a basic brunch board for beginners, and then we’ll get into how to really make them your own.
The beauty of any board, brunch or otherwise, is having options! You’ll want to have a good mixture of flavors and textures to mix and match. Not only does this make grazing from a board extra fun and interesting, but also is sure to satisfy everyone who’s sharing.
Since this is a how-to for brunch boards specifically, here are some options to choose from to create a basic brunch board. I’d recommend picking one or two items from at least 3 categories. Keep in mind that these are just suggestions for beginners, of course - get creative and play around! We’ll go over how to best combine these items later on.


FILLERS
Fillers are like grazing board garnish. They might not be something you’d want to eat on a cracker, but they take a board from basic to professional-looking. There are a few basic fillers that are my go-tos. Just MAKE SURE that all of your organic fillers are safe and edible! You wouldn’t want to fill up a beautiful tray with poisonous plants.
FLOWERS: There are a few beautiful flowers that are technically edible that make excellent filler for grazing boards.
Roses
Violas
Pansies
Lavender
Lilacs
Elderflower
Hibiscus
Marigolds
Chamomile
Sunflowers

SEASONAL DECORATIONS: No matter the season or holiday you’re celebrating with a brunch board, your board can be customized to reflect it perfectly.
Fall: gourds, autumn leaves, mini pumpkins, wrapped Halloween candy
Winter: pine cones, cranberries, pine twigs
Spring: greenery, wrapped Easter candy, spring flowers
Summer: citrus slices, fresh figs, carrot or radish greens
HERBS: Really any herbs make excellent filler! It’s nice to use herbs that go along with the ingredients in your board, but they don’t necessarily have to.
Basil
Sage
Rosemary
Parsley
Rosemary
Chives
THEME IDEAS
Now that you’ve had a glance at some options of what to put on your brunch board, hopefully you’re feeling inspired! But, if you need a little extra push, here are some ideas I’ve come up with for you.
Sunday Morning Pancakes:
Mini pancakes
Various berries, sliced bananas
Whipped cream, sliced butter, maple syrup, honey
Bacon, sausages
Walnuts, pecans

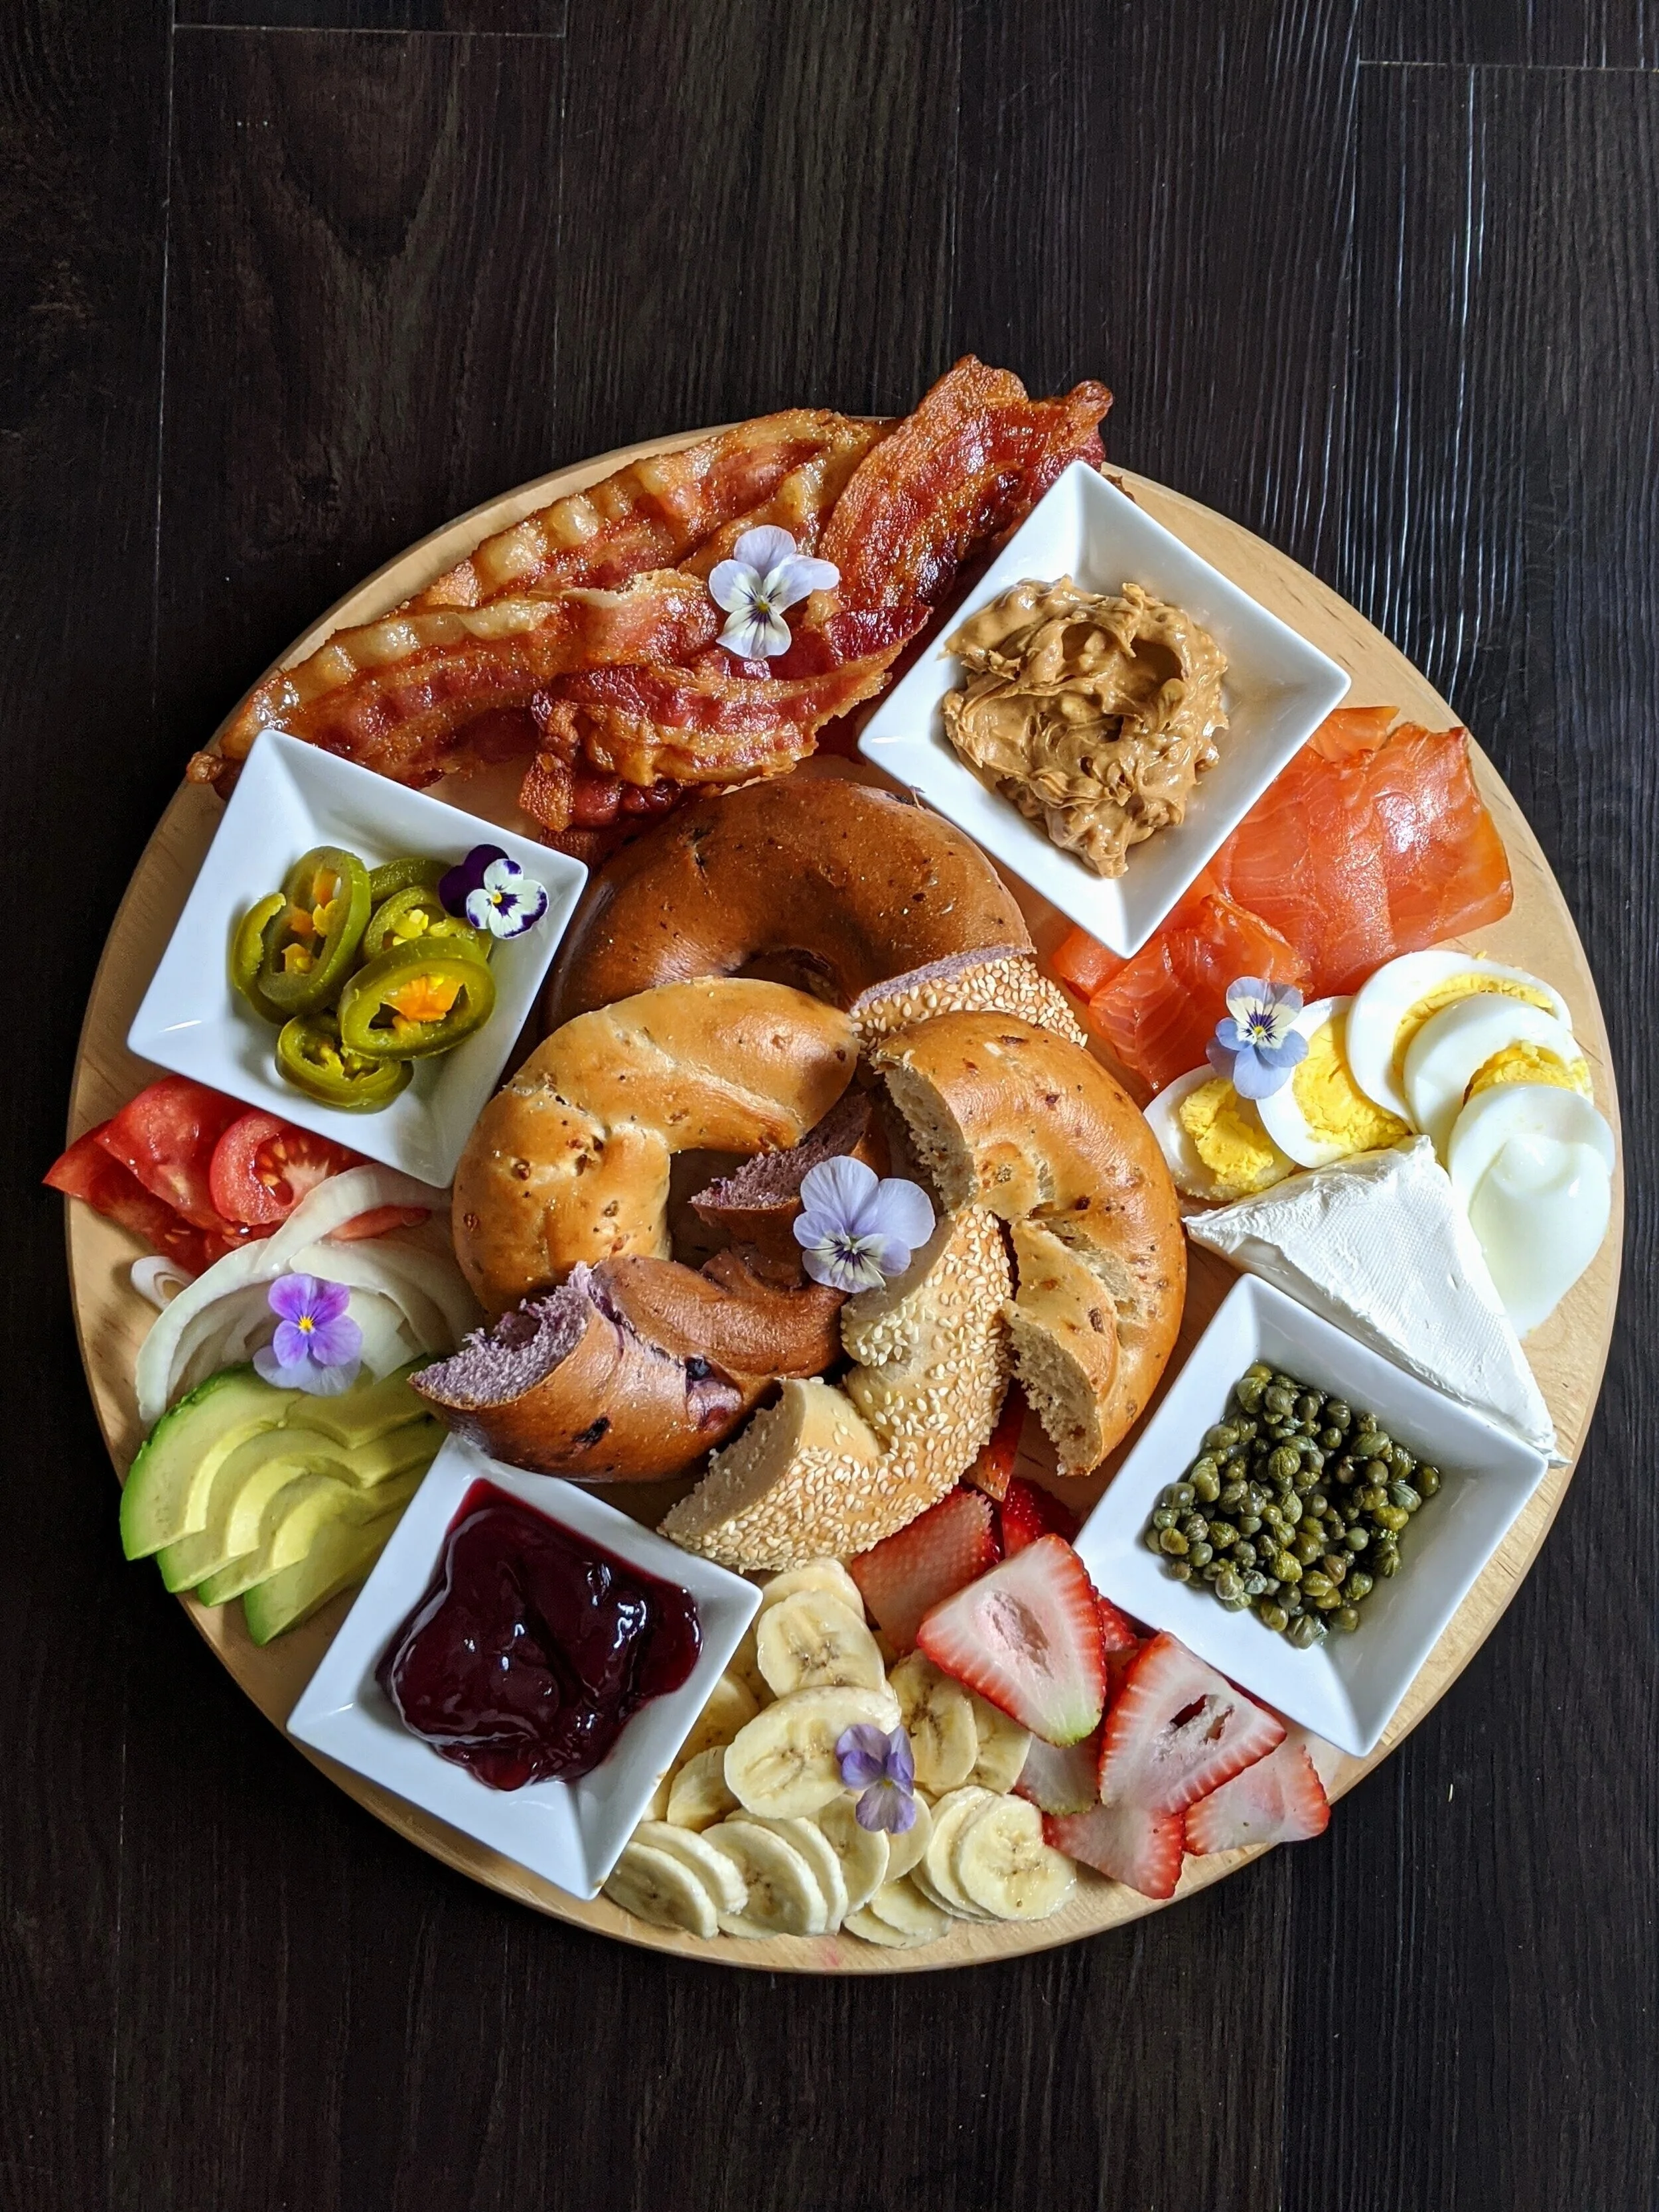
Bagel Bar:
Quartered bagels in various flavors
Bacon, smoked salmon, sliced boiled egg
Cream cheese, butter, peanut butter, jam
Capers, pickled jalapeno
Sliced onion, tomato, avocado
Sliced strawberries, bananas
Classic Charcuterie Brunch
Crackers, toasted bread
Cheddar, brie, parmesan
Salami, ham, prosciutto, sliced turkey
Pickles, olives
Mustard, savory jam, fruit preserves
Sliced tomatoes, berries
Sliced cucumber, radishes, carrots
Chocolate covered pretzels


Build-A-Sandwich
Bread
Cheddar, colby jack, provolone
Sliced turkey, salami, bacon, ham
Lettuce, sliced onion, sliced avocado, sliced tomato, sliced cucumber
Pickles, olives
Aioli, mustard, pesto
Hearty Cowboy Breakfast
Biscuits, pancakes
Ham, sausages, bacon, boiled eggs
Cheddar, pepper jack, colby jack
Butter, maple syrup, sausage gravy, hot sauce

LAYOUT
Now that we’ve got some ideas flowing regarding what to include, let’s talk about what to put them on! Depending on what you have on hand for presentation, you could make a brunch board of any shape.
Since we have a tendency to eat with our eyes first, it’s important to lay things out in an appealing fashion. Here are some tips on aesthetics for 4 different shapes of charcuterie boards: round, rectangular, square, and oval.
Round boards:
One of the most common shapes of boards, it’s easy to make these look good and they’re a great choice for beginner boards. That being said, there are some methods on how to lay them out to look their best.
SUNRAY METHOD: Start with something round in the center of the board, such as a round cheese (like brie for example) or a bowl filled with something. Since it’s going to be in the center of the board, I’d recommend filling this bowl with something that makes sense as the focal point of your board - for instance, if you’re making a waffle themed board, you could fill it with fresh fruit, whipped cream, or the actual pieces of waffle. Once you have your main round focal point, place the other ingredients of the board around the middle circle in a “sunray” pattern, going from the middle to the edge of the circle board.
SEMI-SYMMETRY: Start with 2 or 4 identical bowls of condiments or snacks and place them on opposite sides of the board, mirroring each other. Then, fill in the remaining space with items that continue to semi-mirror each other in terms of placement. For example, if you fill a large gap on one side of the board with cheese slices, you could fill the same sized space directly opposite the cheese slices with bacon strips.

SEMI-SYMMETRY
MULTIPLE CIRCLES: Start by filling a few round dishes of different sizes (I like to do an odd number, usually 3, 5, or 7 dishes) with various condiments and snacks, and place them spread-out around the circle. Once you figure out a layout that you like, start to fill in the empty areas with your main items, followed by fillers.
Rectangle Boards:
The other most common shape of boards, these are great because even if you don’t have a proper display board, most large cutting boards will work great and no one will know the difference! They also pretty much always look nice, no matter the method of layout.
INGREDIENT RIVER: Start by making a “river” of one ingredient flowing in a wavy line from one corner to the opposite corner. Usually this wavy line is made of folded or bunched slices of salami or round slices of bread or crackers. Then, build up the other ingredients in sections around the river.
ROTATING INGREDIENTS: Choose 2 items from at least 4 categories, as well as a filler. Starting at one corner, place a section of an item from one category, then another, then a third, etc. Rotate between categories of items until the board is filled up, and then fill any slightly sparse areas with your filler.

INGREDIENT RIVER
Square Boards:
Slightly less common than round and rectangle boards, these are unique and usually a bit larger, perfect for a small crowd or a large feast!

TRIANGLE COMPOSITION
TRIANGLE COMPOSITION: Similar to how one might lay out a professional photograph, you’ll want to position three main items in a triangle shape within the square - one in the middle of the top, and two in the bottom two corners. I like to put these three items in bowls to make them more of a focal point, and then arrange all other items around the bowls.
RULE OF THIRDS: Place a neat line of an ingredient (I think this pattern works well with lines of crackers or toasted bread pieces) along each of the two vertical sides of the square. Then, fill the center third with the other ingredients using a rectangle board method.

RULE OF THIRDS
Oval Boards:
I think these are one of the prettiest shapes of board, but one that you won’t see as often. Truly, any rectangle or circle board method will work for oval boards as well! I do have one fun layout option that works great for oval boards specifically, however.

THE ZIG-ZAG
THE ZIG-ZAG: This method can be done one of two different ways. The first way is to fill 5 different small dishes with condiments or small items and arrange them in a zig-zag-esque pattern, three across the left and two across the right side of the oval, and filling in the extra space with the remaining items. The other method is more time-consuming and difficult - make a true zig-zag pattern from one end of the oval to the other with either all one ingredient or ingredients of the same color. Then, fill in the triangles created by the zig-zag with the remaining ingredients.
TIPS & TRICKS:
Now that you’ve got some ideas flowing, here are a few more things to keep in mind as you create your beautiful board.
Timing
It is important to keep in mind that everything on your board should be served at the ideal temperature for that item. If you’re a beginner at putting together boards, it might be smart to make a board where most of the items should be served cold so that you can lay out the majority of the board ahead of time and add the carbs, like bread or crackers, at the end (these items will get stale in the refrigerator). Also, you should of course add any warm cooked components, such as pancakes or bacon, at the end when they’re fresh and hot. If you’re making a more complicated board, perhaps make yourself a list either mentally or on paper of which items to add when to make sure everything is at its best.


Keep it Colorful
When you’re deciding what to include on your board, it can be helpful to not only consider which flavors and textures to include, but how the colors will look together. If your board is looking rather brown and tan, add some fresh fruits and colorful floral filler to spruce it up. Remember that people eat with their eyes first!
Sweet Vs. Savory
No matter what the theme of your board is, it’s best to have something sweet to even out the savory and vice versa. It’s hard to eat a big pile of waffles and cream, but much easier to do so when you have some salty bacon to eat between bites! Remember to add one or two ingredients that will even out your main dish.


Textures
One more thing to keep in mind is to make sure to have varying textures in your board. It’s good to have something crunchy (like crackers), something juicy (like fruit or pickles), something creamy (like cheeses), and a few condiments to mix and match with.
Now it’s your turn to make some amazing brunch boards! Leave me a like or a comment if you enjoyed this little guide, and have a wonderful brunch!